Fonctionnement d’une colonne à plateaux (fractionnement)
Rappel : principe de la distillation simple :
On va considérer le cas le plus simple du mélange d’eau et d’éthanol où l’éthanol est le composé le plus volatil.
A l'instant où les premières vapeurs sont dégagées leur composition est plus riche en éthanol que le mélange initial. Au cours du temps, la fraction d’éthanol du liquide dans le bouilleur diminue car il s'évapore une proportion plus grande d’éthanol que d’eau. Les vapeurs seront toujours plus riches en éthanol que le mélange liquide dans le bouilleur mais leur composition montrera une teneur en éthanol plus faible qu'initialement. On obtient donc un distillat de moins en moins concentré en éthanol. Au cours de la distillation la température va augmenter dans le bouilleur car le liquide s'appauvrit en composé le plus volatil.
A la fin il ne reste pratiquement que de l’eau dans le bouilleur et les vapeurs sont donc pratiquement uniquement composées d’eau.
Si on redistille le produit obtenu, on va à nouveau le concentrer, sa teneur en eau diminuant à nouveau.
Distillation continue :
Dans une colonne à distillation continue, on utilise des plateaux sur lesquels se produit chaque fois une « distillation ». Schématiquement (pardon pour ce raccourci peu scientifique), une colonne à 5 plateaux équivaut à une quintuple distillation.
La colonne de distillation continue possède donc une série de plateaux de raffinage pour augmenter la pureté. Ce sont des espèces de plateaux sur lesquels le liquide flue et le gaz bouillonne à travers des orifices qui existent à cet endroit. Certains des composants moins volatils vont également s’évaporer et ces séries de plateaux, qui ont des températures de plus en plus basses au fur et à mesure que nous atteignons le haut de la colonne, vont condenser les composants les moins volatils en liquide.
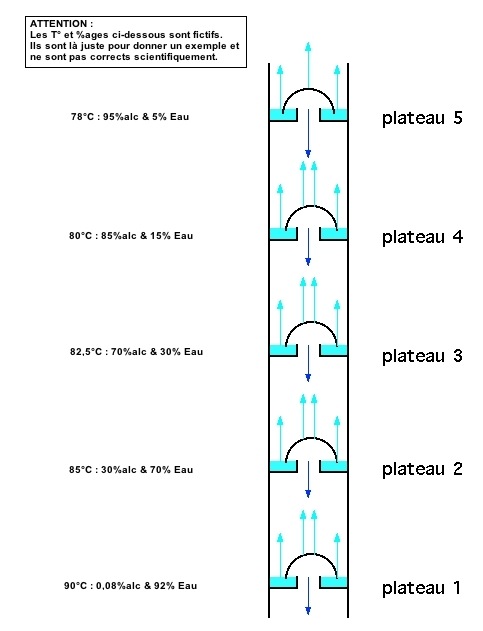
En théorie, chaque plateau doit être en équilibre liquide-vapeur, c’est-à-dire qu’à une température donnée on a à la fois le mélange moins riche en alcool à l’état liquide et le mélange plus riche en alcool à l’état de vapeur. Ce mélange vapeur se condensera sur le plateau suivant où un nouvel équilibre se crée, à une température moins élevée.
Le pouvoir séparateur (séparation des deux composés du mélange) d’une colonne est maximal si la colonne est adiabatique (elle ne cède pas d’énergie à l’extérieur). Les échanges thermiques n’ont alors lieu qu’entre la vapeur montante et le liquide descendant. On isolera donc la colonne par exemple en l’entourant d’un isolant thermique.
On mesure le pouvoir séparateur d’une colonne en plateaux théoriques. Il s’agit du nombre d’étages isothermes : la température de chaque plateau va en fait se stabiliser, chaque plateau ayant une température qui lui est propre, du plus chaud en bas de la colonne, au moins chaud en haut. Rappelons que plus ce nombre de plateaux est grand, plus la séparation sera bonne.
Cependant, il y a un problème par rapport au design et à la construction de ces plateaux car ils ne sont pas conseillés pour les colonnes avec un diamètre inférieur à 30 centimètres. Le remplissage de la colonne (« packing » en anglais) remplace les plateaux. La hauteur idéale de remplissage nécessaire pour atteindre le même effet que celui produit par un plateau est appelé HETP - Height Equivalent to a Theoretical Plate (Hauteur Équivalente de l’Étage Théorique). Les plus petites HETPs sont meilleures que les plus grandes. Une colonne avec une plus grande hauteur (par exemple, une colonne d’1 mètre) aura plus de plateaux. Par exemple, si le HETP est de 0,5 mètres, il y aura deux plateaux qui fonctionneront. Par contre, si le HETP est de 0,25 mètres, il y aura quatre plateaux qui fonctionneront.
Voici le HETP de quelques matériaux :
Tampons « scrubbers » en inox ou cuivre : 0,13 m
Billes de 10mm de diamètre : 0,33 m
Rashig rings de 6mm : 0,24 m
Une colonne remplie de scrubbers sur une hauteur de 65 cm équivaut donc à 5 plateaux, ce qui permet théoriquement d'obtenir de l'alcool à 95%vol.
Les éléments de remplissage se trouveront à de plus hautes températures dans la base qu'en haut de la colonne. Lorsque les vapeurs entrent en contact avec le matériel de remplissage, les substances les moins volatiles, qui ont un point d'ebullition plus bas, se condenseront et tomberont. Ensuite, ce liquide s'evaporera de nouveau et la vapeur sera riche en composants plus volatils. Le matériel de remplissage vise à maintenir le distillat intermédiaire en place pour qu'il puisse être baigné par les vapeurs chaudes ascendantes. Ainsi les substances les plus volatiles seront extraites du distillat intermédiaire.
Calcul du HETP de votre alambic ...
See http://www.raschig-rings.com for more information on other column packing details. Note also that when real plates are used
in a column, you also need to do a similar calculation - they are often far from ideal in
operation, and you may need several to achieve one HETP.
Jan Willem of http://www.geocities.com/homedistilling/
experimented with this ...
I get 94% at a rate of ~ 500mL/hour. My column is 115cm long and 42mm wide
Filled with potscrubbers from the undersite to just under the
precooling coil. (Tony - ie its of a good design already - heaps of HETP)
At my latest distilling escapade I turned the reflux ratio up.
Just as a test that would show me how pure it could get AND if there
was a taste diffirence (after dilluting ofcourse)
Collected the good stuff at 100mL/hour (a long wait)
Then the score was initialy 95.?% and was going down a bit to 94.5%
(Dunno if it was 94.3 or 94.8 so I say 94.5%)
After the taste test I noticed NO difference, but I'm no expert at
wodka tasting.
The improvement isn’t linear either - you can halve
the HETP for
Stainless Steel Wool (SS below) by going from "bugger-all"
reflux
to "some" reflux, but there is little improvement winding
it up
too far past there.

SS = Stainless Steel Wool Scrubbers, RR6 = 6mm Ceramic Raschig Rings,
RR13 = 13mm Ceramic Raschig Rings, M = 10mm Marbles
So, put these together to work out your still performance;
- Determine the HETP for the packing you are using, then
- Work out for the height of packing you have, how many
Ideal
Plates you have, then - Look up the purity expected for that number of plates.

SS = Stainless Steel Wool Scrubbers, RR6 = 6mm Ceramic Raschig Rings,
RR13 = 13mm Ceramic Raschig Rings, M = 10mm Marbles
But what diameter should the column be ? This needs to
be worked out
from the amount of heat you are putting in. The more heat,
the more vapour
you generate. If the vapour rate is too great, then instead
of having
your refluxing liquid flowing down the column, it will be
blown out the
top. You also need to consider how much space the packing
is taking up
too. The following diagram is based on the calculations -
unfortunately
the sizes are about 50% smaller than what appears the
actual limit, so
scale up the calculated result if you plan on following
them.

SS = Stainless Steel Wool Scrubbers, RR6 = 6mm Ceramic Raschig Rings,
RR13 = 13mm Ceramic Raschig Rings, M = 10mm Marbles
Instead, I scale up/down for what I know works for me ... using scrubbers for packing,
a 1.5" diameter column can handle 1800W. So .. for constant vapour rate per cross-sectional area ...
Maximum Power for a Given Column Diameter
1.00" = 800 W
1.25" = 1250 W
1.50" = 1800 W
1.75" = 2450 W
2.00" = 3200 W
2.25" = 4050 W
2.50" = 5000 W
Note that these figures are roughly the maximum power that you would want to use for any
given column diameter. Mike argues that you should use quite a lot less power ...
All these figures above equate to a vapor speed up the column of 119 cm/sec (47"/sec)
Assuming for ease a column length of 119cm, that means that vapor will traverse the column in one second, and during that time it is busy condensing and being reboiled many times.
Tony reported that a 25mm diameter column at 1350W gave very poor results, but a 36mm diameter column handled that power well.
Vapor speed through the 25mm column would have been 211 cm/sec, so it's not surprising that it didn't work well as the vapor had only 0.56 seconds to traverse the column. Increasing the column diameter to 36mm brought the speed down to 101 cm/sec, so the transit time increased to 1.2 seconds. This is on the 'safe side' of the recommended figures in the table.
I personally favor lower power settings, and the reason lies in measurements I did with column stability, measuring the temperature gradient at steady state for different power settings, and first using a simple reflux column that relied solely in internal condensation for reflux. (A not-to-scale schematic has been posted in the Photos section of Distillers. It's called 'Temperature gradients')
I used a 2" diameter column and found that at 750W the temperature gradient settled out 2/3 of the way up the column, at around 80cm. This told me that vapor moving at 28 cm/sec had fully separated after spending 2.5 seconds in the packing. Increasing the heat input raised the point at which the straight line met the curve, but when the curve reached the top of the packing, the curve switched to the straight line sharply, not asymptotically, and the temp in the top rose to match the increasing temp at the top of the packing. So using 1350W with a 25mm column would result in full separation occurring at a point right at the top of the column, with little or no leeway.
Adding imposed reflux with a compound column did little to change the temperature gradient up the column, but what it did do was add that touch more separation in the region above the top of the packing. I could detect no change in the 'asymptotic' nature of the temp gradient when the straight section still lay inside the packing, but when power was increased to raise that point to the tip of the packing then the more I increased the power a sharp 'step' began to appear. The straight line went down to the top of the packing, then quickly jumped to meet the temp in the top section of packing. This indicated to me that the composition of the cycled vapour in the void between the top of the packing and the top condenser was the result of further separation imposed by the imposed reflux operation in that region. In effect, I had two stills one on top of the other, the bottom being a simple reflux still relying on internal reflux, and a recycling still that took what the reflux still gave it and used that as its starting point. This held true until either the power was increased to a point when the curve would have settled down itself in a longer column (about a quarter extra length) or the take-off ratio was increased to a stage when the sharp step suddenly broke down and the old asymptotic curve re-asserted itself, and quality instantly dropped.
OK ... so what has all this got to do with those figures in the table?
Essentially, it is that the figures in the table are good for indicating the maximum you can push a simple reflux column to and attain full separation ... just!
If consistent results are wanted, then the aim should surely be to allow some leeway and try to get that curve settling down before the top of the packing is reached. That way, the reflux column has a chance to do its job as fully as it can before either taking off product, as in a simple reflux still, or passing on the results to a secondary top section that operates with imposed reflux for that final touch of separation. My personal 'cautious old fuddy-duddy' approach would be to reduce all those wattage figures in the table to 1/4 of what they are now and regard that as a good guide for reliable operation. This sounds drastic but, when you think about it, gives much greater assurance of high quality with simple reflux stills, and greater flexibility in take-off rates with a compound still. Maybe I'm just an aging Sunday Driver, but I find that I get to where I'm going with less hassle than a Boy Racer, and both my passengers and booze samplers enjoy the ride better!
Generally, a 2" (50mm) diameter is an ideal size to use. This will happily run from
750W up to 2500W without any trouble. If in doubt, go for 2".
Its this amount of energy that you put in which will determine the
rate at which you make and collect the distillate. If collected at the
condenser at say 95%, it works out roughly to the following figures. If you
run a reflux ratio of 4 (e.g. return 40 mL for every 10 mL you keep -
typical for SS scrubbers) - then the second figure is the flowrate you'd
expect to collect at ...
1000 W = 52 mL/min (max, no reflux) or 10 mL/min (if RR=4)
1500 W = 78 mL/min (max, no reflux) or 16 mL/min (if RR=4)
2000 W = 105 mL/min (max, no reflux) or 21 mL/min (if RR=4)
2500 W = 131 mL/min (max, no reflux) or 26 mL/min (if RR=4)
3000 W = 157 mL/min (max, no reflux) or 32 mL/min (if RR=4)
3500 W = 183 mL/min (max, no reflux) or 36 mL/min (if RR=4)
4000 W = 209 mL/min (max, no reflux) or 42 mL/min (if RR=4)
Note though that you are probably going to be limited in how much
power you can deliver to the still. Many homes only run 10 amp fuses in their
fuseboxes. This will limit you to 240 V x 10 A = 2400 W before you have
to have a safety chat with your electrician about upgrading the wiring.
The risk of making the column diameter too small is that the column
will "flood", as discussed in "Chemical Engineering - June 2002" pp 60-67 by Simon Xu and Lowell Pless about flooding in distillation columns. These guys have been using "gamma scanning" to work out where abouts various distillation columns are flooding, and why. I'll quote a few paragraphs about "packed columns" for ya (they also did a fair bit on trayed columns) ....
For a given packed column, at the high end of liquid and vapour rates we encounter flooding as liquid backs up the column and fills all the void space in the packing bed. Poor disengagement between vapour and liquid (back mixing) reduces the separation efficiency, and the high liquid hold-up in the bed increases the pressure drop.
The traditional approach to analysing flooding in packed columns relies on measuring pressure drop. At low liquid rates, the open area of the packing is practically the same as for dry packing. In this regime the pressure drop is proportional to the square of the vapour flowrate. As the vapour rate continues to increase, eventually a point is reached when the vapour begins to interfere with the downward liquid flow, holding up liquid in the packing. The increase in the pressure drop is proportional to a power greater than 2.
At this point, the pressure drop starts to increase rapidly because the accumulation of liquid in the packing reduces the void area available for the vapour flow. This area is called the "loading region". As the liquid accumulation increases, a condition is reached where the liquid phase becomes continuous .....
The problem with this traditional approach is the difficulty in differentiating between the transition points of the loading or flooding in the pressure drop curve. Some suggestions for the definition of when a packed column become fully "flooded" are :
* the slope of the pressure drop curve goes to infinity
* the gas velocity is so great that efficiency goes to zero
* pressure drop reaches 2 in.H2O per foot of packing
* pressure drop rapidly increases in a region, with simultaneous loss of mass-transfer efficiency ......
There are two forms of liquid hold-up in packed columns. One is referred to as static hold-up. Static hold-up is the amount of liquid that is held onto the packing after it has been wetted, then drained - the film of liquid or droplets of liquid that adhere to the packing. This amount jointly depends upon the physical properties of the liquid and the type and material of the packing.
The second aspect is the operating or dynamic hold-up. Dynamic hold-up is the amount of liquid held in the packing by the interaction of the vapour and liquid flows. Dynamic hold-up must be measured experimentally. To measure this amount, instantaneously stop the liquid and vapour flows, then collect and measure the volume of liquid that drains from the packing. The total liquid hold-up in packing is the sum of these two forms of hold-up.....since the static hold-up is constant, the operating or dynamic hold-up changes in proportion to changes in liquid and vapour rates. The void fractions in a packed bed may change across the bed due to fouling or damage, and vapour-liquid loads may be different along the bed for different operating conditions. The peak loading could occur anywhere in a packed bed, or a liquid distributor could initiate the flooding......
An interesting phenomenon for random packing and most corrugated sheet packing is that the separation efficiency of an "initial flooding" bed could be better than a "normal" bed, because of high liquid hold-up and intimate vapour-liquid contact in the "frothing" regime..... But at the high-efficiency state it is difficult to keep the column stable, and the column could go out of control as a result of any slight process turbulence. For this reason it is always recommended to avoid designing a packed column close to the initial flooding point. In operation we would not then be overly concerned with some liquid accumulation or hold-up, as long as the column could be kept stable and under control......
Stainless Steel Wool Scrubbers/Scourers
From the above analysis, I figure that Stainless Steel Wool Scrubbers (pot scourers)
are 2-3 times better than rachig rings with the typical small diameter columns we
use in this hobby.
Using these as the best type of packing will allow you to use a smaller column or a lower
reflux ratio to get the same purity. Or keep the same height & reflux
ratio, and have improved purity. Are you happy with the existing purity, or
do you want cleaner alcohol ?
The stainless steel scrubbers are probably only good however up to about 2-3 inch
diameter columns. Beyond this, they will be difficult to keep in place &
have even liquid flow over them (e.g. don't want areas where they are really
packed tight or spread too thin - it has to be uniform). It is at the
larger diameters that the more regular packings like rachig rings come into
their own (as they won't compact up or seperate to leave holes),
and for even larger diameters, that you'd consider structured
packings (i.e. carefully stacked into a regular pattern). One rule of thumb
I've heard of for raching rings is to size them 1/10th the diameter of the
column; e.g. the small 6mm rachig rings are really only suitable down to
about 60mm (2.4") diameter columns (and they're expensive!).
So for columns up to 2-3 inches in diameter (50-75mm), you might as well
go for the better performing, cheaper option of scrubbers. Bigger than this though,
and you might need to start using what commercial units do.
David comments ...
I use 3M ones
myself as I have found them the best quality. Use a good quality one
preferably. On a 1.5 or 2" column each should fill 55mm to 75mm (max) of
column (less on 2"). Even less if you prefer. I tend to work in the vicinity
of each filling somewhere between 55 and 63mm. At 55mm on a 36" column this
equates to almost 17 from which I deduct 1 to allow for space at the top ie.
=16. Allow at least 2" to 2.5" of clear space between the top of the
scrubbers and the takeoff point for the vapour to expand into and so the
reflux falls back into the scrubbers.
Do not unravel but tease them out by hand a bit so they fill the whole
column diameter rather than just a part of it. Most of the ones I have seen
in NZ do not have rubber bands around them. Place them into the column from
the bottom one at a time using some sort of restriction at the top and
bottom to prevent them going further or dropping out back into the boiler..
I use a 2" pall ring which works well.
On a slightly longer column (1m = 39.37" ) I use 19 off memory so 17 is
probably around the right number. You dont want them too loose or too tight.
If too tight they will compact more. The main thing is to have an even
constant heat so you dont get surging. Surging causes compaction.
Calculations
I've developed a couple of interactive pages which do all these
calculations for you :
- Physical data for Ethanol &
Water
- Pot Still calcs
- Reflux Still calcs.
- Detail of the Equations used
- Interactive Heat & Mass
Balance model
Designing Your Own Still
So how do you put all this together to make your own still ?
Say you're looking at wanting to make 90%+ purity, off a 20L wash.
Pot
To hold 20L you want at least another 1/4 spare for foam, etc.
So go for something in the 25-30L range. I'd suggest something
where you can easily lock the lid down, but also be able to get
into it fully to clean it out. Suggestions include paint tins as
seen in walt or
AV25L or a preserving pan
with a clipped lid like Teds at http://mwci.s5.com/.
These all have pretty thin lids, so to support the column,
you may need a small flange to help hold it all up, or a stiffening
plate/oversized washer to help strengthen the lid.
Heating Element
Probably in the 1000-1500 W size. Whats cost-effective for you ?
A 1500W element will heat up the contents to begin in around 65
minutes, but a 1000W will take 98 minutes. If time is crucial, you
could add a second element to act as a boost during the initial heat up.
Column Sizing
The diameter is based on the amount of heat you're using, whereas
its length determines what purity you'll get. Its a hobby
still, so I've assumed that the packing will be stainless steel or
copper scourers - they only take about 1/2 the height that marbles do
to get the same purity. You will also need to insulate the whole
length of column too - plumbing suppliers sell slip-on piping
insulation for around NZ$8/m
Diameter : 1 inch is too narrow for a 1380W element, but
1.5 inch is OK with a 1800W element. Roughly, lets say to use
1.5 inch for 1000W - 1500W and 1.75 - 2 inch for 1500W - 2000W.
If in doubt, go up in size by say 0.25 inch. Too narrow will lead
to all manner of problems & difficult operation, but too wide will
only give a minimal reduction in purity. 2" is a well used, very reliable
diameter that works under most circumstances.
Height : This is the purity. Use the wee interactive
applet at the start of this page
to see how the number of stages or HETP's improves the purity.
Its easy to get the first gains up to 90%, but then more difficult
to squeeze out the last improvements towards 95%+ Lets assume
(we'll come back to this) that each HETP for scrubbing pads is around
15cm... then for a 15% wash,
No packing, purity = 62% , 15cm packing = 82%, 30cm = 88%, 45cm =
90%, 60cm = 92%, 75cm = 92.8%, 90cm = 93.4%, 105cm = 93.9%.
These won't be exact, and depend on a number of different factors,
but it shouldn't be too far off. So, if height is a problem, and
you're happy with low 90's, then 60cm should do ya. If you want
to make a perfect vodka, go for 120 to 150cm. Normally I'd recommend at
least 100cm, but the choice is yours, as it depends on the type
of product you want to make.
These numbers assume that we've reached equilbrium nicely for
each 15cm of packing. To do so, we need to provide heaps of surface
area for the liquid and vapour to mingle over (done - using scrubbers),
and that we're refluxing a large proportion of the vapour back down
as liquid, rather than keeping it. But this means that our take-off
will be rather slow. Eg we may be able to start out with a reflux
ratio of say 3-4 (ie return 30-40mL for every 10 mL we keep) when the
pot is very rich in alcohol, but later on, when its getting down in
alcohol, we may need to increase this up to 5-10 to keep the high purity.
A reflux ratio of 4, with a 1500W element means that we're collecting
at around 20 mL/min. Thus a 20L 15% wash will take a minimum of 2.5 hours to
collect (20 mL/min), up to 5 hours at a reflux ratio of 8 (10 mL/min). The
actual time will be somewhere between these, depending on what ratio you end up
needing in order to deliver the purity you're after.
If the distilling time is taking too long, we can make the column taller,
and then run at a slightly smaller reflux ratio, to get the same purity.
The collection rate is directly proportional to the element size, so if a
1500W element with reflux ratio of 4 takes 3 hours to distill, then 1000W will
take 4.5 hours, or a 2000W 2.25 hours.
Making the Reflux
Theres a couple of different options for how to provide the refluxing liquid.
The choices come down to how much control you want over it.

The first, simplest and cheapest, is just to have a cooling coil in the head
of the column, which is fed cooling water direct from the condensor. Provided
you have sufficient coil surface area available (eg > 1-2 m), you should be able to increase
and control the reflux ratio to give you the high purity. If you only have a couple
of coils inside the column (like I've drawn), then you wan't be able to make enough reflux, and
you're in for mediocre results.
Second - plumb the cooling coil with its own water supply - say a T joint
off the main line, with a couple of valves to be able to regulate the water to
the coil seperately from the main condensor. This would allow you to say turn off the coil if you want
to do a stripping run, without affecting the performance of the main condensor.
For excellent instruction on fitting a coil, see Homers
href="image/homer_coil.jpg">diagram or a couple of Phils
photos.
If the main column is too narrow to have a coiling coil inside it, you can
always use a cold collar around the outside of it. Another, but less effective
method is to coil around the outside of the column.
There are excellent instructions for making the external condensor in the
"StillMaker" pdf, or at Http://www.Moonshine-Still.com.
Basically just use a couple of T fittings, or if you're a dab hand at welding, just
build it up yourself. Another (easier) option is the "Euro" still condensor, where
the cooling water is simply fed in a tube up through the outlet pipe.
See a photo of it.
Third (my preferred option) is to do the Nixon style of condensor, as seen in the
photos, where all the vapour is condensed (with an oversized
coil - thus minimal water required), and then you proportion off the amount of
liquid you keep vs return. This gives you maximum control over the reflux ratio,
being able to dial it up from "total reflux", essential for getting a column into
equilbrium before taking off the heads, through to "no reflux" if you want to do
a stripping run, or only a low reflux run say for a flavourful rum or the like.
The disadvantage of this design is that it adds to the height - say another
30 cm. But I reckon well worth it.
An excellent variation on that is Alex's (Bokakob) mini-still:

Controls
I prefer to only control the reflux ratio. If the column is wide enough, then you
don't need to worry about metering the heat input via the element. Either up the
water flowrate, or close down the take-off valve, in response to the vapour
temperature measured at the top of the column. Use this graph below
to compare temperature to purity. Cheap (NZ$28 at www.dse.co.nz ) digital thermometers are
excellent for reading this temperature.

Summary
So, in summary, to make a very cheap, short still, how about a 1500W element, with a 1.5 inch
by 60-70cm column, scrubber packing, and simple external condensor (Euro style) & internal
cooling coil of say 4-5 turns, directly plumbed between the two.
To make a more high performance still with more options on how to run it & what products
you can make from it, first make it taller, and then consider using the Nixon condensor.
http://homedistiller.org This page last modified |